The 30-Second Trick For Drywall Repair Columbia
Table of ContentsThe Facts About Drywall Repair Columbia RevealedThe 20-Second Trick For Drywall Repair ColumbiaThe Main Principles Of Drywall Repair Columbia About Drywall Repair Columbia
Squeeze some, yet not all, of the compound out from under the tape so you do not develop a huge bulge on the wall. Quickly apply a light finish to the topside of the tape, tapering it out onto the wall.Cords as well as pipelines are commonly found where they do not belong. Less is typically a lot more when it involves joint compound. Drywall Repair Columbia. A slim layer is easier to sand, and also you'll be less most likely to remove excessive while sanding and also expose the patch. Additionally, for joint substance to show up flush with the wall near the damages website, "feather" the mud as you use it.
— Cloud Links (@ldcloudlinks) January 26, 2023
After the first round of sanding, add a second layer of mud, spreading it concerning 2 inches past the boundaries of the first layer.
A lot of drywall fixing sets included everything you require for wall surface fixing, including the mesh, spackle, putty knife, and sandpaper. Begin by positioning the spot over the opening, after that spread joint substance over the patch and also smooth around the sides. When completely dry, sand till smooth. As a house works out, its framing can twist.
Some Ideas on Drywall Repair Columbia You Should Know
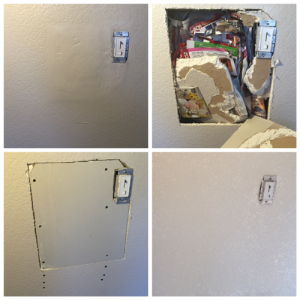
Drive a drywall screw midway into the facility of the strip. Holding the strip by the screw head, area it inside the hole. Position the furring strip so that the drywall overlaps it on either side. While holding the furring strip in position, drive numerous screws through the drywall into the furring strip to make sure that it's secured in location.
Picture: istockphoto. com, Several DIYers cut corners by failing to utilize drywall tape when mudding joints. This is a mistake. Drywall tape aids hold the joint substance in place, preventing it from sagging as it dries or splitting and also crumbling out of the seam with time. There are several styles of drywall tape you can utilize.
Picture: istockphoto. com, Assume you're done? my website Not so rapid! Run your turn over the fixing to make certain that it feels smooth. With your holy place versus the wall surface, look for bulges that may need much more sanding. Once you're pleased with the look of your patch task, prime and also repaint the location.
More About Drywall Repair Columbia
, although you can buy bigger patches separately. Make sure the opening you need to repair is little sufficient for these patches to cover before making use of one of these packages (Drywall Repair Columbia).
Touch up the wall paint. Pointer: If it's been a while given that the wall was last painted, you might need to paint the whole wall surface, not just the patched area, to make sure the shade matches.
Textured drywall is a little bit more complicated, however still rather easy to repair. Sand my company your patch location smooth.

The Definitive Guide for Drywall Repair Columbia
Shake the can and also spray the patch location in a circular movement 6-18 inches from the wall. Permit the textured compound to completely dry according to the producer's directions, after that prime and paint the surface.
It might seem counterproductive to cut a larger opening in the wall surface, yet it is the only method to obtain a solid, smooth surface ultimately. To cut your opening, start by making use of a stud finder to situate the studs on either side of the damage and also place a level above the hole, straddling both studs.
Our residence featured a layer of 3/8-inch drywall underneath the 1/2-inch drywall, most likely as a way of bringing the surface area of the drywall out to satisfy a plaster surface area or existing drywall. To prevent purchasing and reducing material to pad the stud as well as compose the difference, we left the 3/8-inch drywall on the studs as a spacer and also placed the 1/2-inch drywall over top of it, equally as we found it.
If you were to just screw a patch to the studs on each end, your drywall mud would certainly break quickly and also the patch itself would never ever make it through also the smallest hit. Since of this, it is clever to place a scrap piece of wood in the facility of your intermediary and screw it in area using drywall screws via the existing drywall (Image 1).